


Wednesday, December 26, 2012
9 Strange New Year’s Traditions from Around the World
If you chose to be a little cultural this year and celebrate New Years in a different way, here are a couple of traditions that take place all over the world on the 31 of December.
South America - Residents all wear brightly colored underpants. Those who wear red, are hoping for love in the new year. Those who chose to wear yellow, are wishing for money.
Denmark - Many Danish leap off chairs at midnight, hoping to ban all bad spirits in the new year. They also have a very loud and destructive way of celebrating the new year- they break dishes. People throw their old dishes on their friends’ doors on New Years and the one with the most dishes outside their door, usually has the most friends.
Philippines - It is a tradition in the Philippines, that Filipinos focus on all round things. They consume round fruits such as grapes and wear clothing with round shapes such as polka dots. The round shape reminds and celebrates the roundness of coins, as they hope for prosperity in the new year.
Spain - At midnight, Spaniards consume 12 grapes and try to consume all of them by the time the clock stops chiming.
Belarus - In Belarus, unmarried women compete at games of skill to determine who will get married first in the new year. One game involves setting piles of corn and a rooster before each of the single ladies. Whichever pile the bird approaches first, is believed to be the one who is to be married first.
Germany and Austria - Germans and Austrians pour lead as a tradition, which includes using molten lead like tea leaves. The lead pieces are pour into a bowl filled with water, leading the lead to form shapes which predict what is going to happen in the new year. If the lead forms a ball it means good luck, if it looks like an anchor it means you will need help in the new year and if it’s a cross it means death.
Ecuador - Usually when you burn someone’s picture it means bad break up. However in Ecuador, the fiesta includes all the locals gathering together with pictures that represent something you do not want in the new year from the last year and burning it.
Chile - In the city of Talca in Chili, people participate in a mass on New Years Eve and then they all go visit the graveyard, to set up their chairs and wait for the year to arrive with the dead.
Puerto Rico - When it’s New Year’s Eve in Puerto Rico, they throw buckets of water out the window to “clean” the old year out. They also clean their homes and decorate them, as it is supposed to symbolize the “cleaning” of the spirit.
Wednesday, December 19, 2012
Hornet's Wives Luncheon Gifts
Chet Pourciau Design was asked to create a fabulous door prize and 150 small gifts for the Hornet's Wives Luncheon that is being held today. We were so excited to help! Below are photos of what we came up with.


A door prize anyone would love!

Thursday, November 29, 2012
Behind the Scenes Chet Chat Photos
Just wanted to share some behind the scenes photos from the taping of Chet Chat's upcoming Holiday Show.
.JPG)
Missy with Gambit Weekly and CUE
.JPG)
Marines with Toys for Tots
.JPG)
Chef Tariq Hanna from Sucre
.JPG)
Delicious Sucre cake
DIY Wine Bottle Vase


Here's a quick and easy Christmas DIY using recycled wine bottles. Follow the instructions below to make your own wine bottle vases.
What you will need:
- Recycled bottles
- Hot glue
- Spray primer
- Krylon Frosted Glass Spray
- Hot water
- Soapy sponge
- Clean rag

Soak your bottles in hot water and then use a soapy sponge to remove labels. Use a clean rag to dry off the bottles.

If you want to add a little extra Christmas spirit to the bottles, you can use a hot glue gun to embellish. Let dry.


To get a white finish: Spray white primer in quick motions onto the bottle. Make sure you are in a well ventilated space. Let dry.

You can use green bottles too.

Spray green bottles with Krylon Frosted Glass spray. Let dry.

Enjoy!
Saturday, November 24, 2012
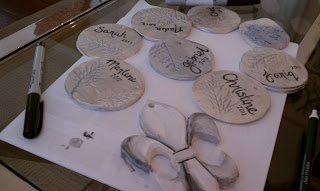
DIY Clay Ornaments
These clay ornaments are a nice personal touch to any gift. They can be used as name tags on presents or even on the dinner table. Follow the instructions below to make your own.

What you will need:


What you will need:
- Sculpey Clay (see picture below)
- Baking sheet
- A circle cookie cutter (I used a glass)
- A leaf or spray of your Christmas tree


Roll out some clay to about an 1/4" thickness and then use a glass or cookie cutter to make a circle

I like to make many ornaments at once because you have to bake them all.

Press a shape into your ornament. I used a piece of my neighbor's tree, but you can use anything

Roll the glass over the clay to make sure your shape is visible

Bake according to the kind of clay you bought. I baked these for 15 minutes at 275 degrees.

Paint and decorate as you wish. Enjoy!
Tuesday, October 23, 2012
In The NOLA - Entrepreneur Spotlight: Chet Pourciau of ‘Chet Pourciau Design’
Chet Pourciau is one of In The NOLA's Entrepreneur Spotlights! Check out this LINK for the full article.


http://www.inthenola.com/local-spotlights/entrepreneurs/item/3754-entrepreneur-spotlight-chet-pourciau-of-/
http://www.inthenola.com/local-spotlights/entrepreneurs/item/3754-entrepreneur-spotlight-chet-pourciau-of-/
Friday, October 19, 2012
Junior League of New Orleans
Do you want to SAVE 20% at over
145 retailers and restaurants
Friday, November 2nd - Sunday, November 11th?
Get started on your holiday shopping and feel good about saving!
Make a $35 donation to the Junior League of New Orleans
and you will receive a
Buy, Save and Serve savings card
Valid for 20% Off at our store and many others!!
Your donation benefits 17 community outreach projects in the New Orleans area including Second Harvest Food Bank, Freret Neighborhood Outreach and Samuel J. Green School’s Edible Schoolyard.
For a list of participating retailers and to get your card, go online now to www.jlno.org/BuySaveServe or at our store!
Thursday, October 18, 2012
DIY Cheese Cloth Ghosts


I love these cheese cloth ghosts. They are very easy to make and a fun project for kids. Follow the instructions below to make your own.
What you will need:
- Spray starch
- Cheese cloth
- Soda bottle
- Metal hanger
- Balloon
- Scissors
- Tape


Bend the hanger to look like arms and tape to top of soda bottle. Blow balloon to make a medium sized head for your ghost. Tape the balloon and hanger to make sure everything is secure.

Here is a front view.

If you don't have a soda bottle and hanger, or you want to make a smaller ghosts, use whatever you have around the house to make a ghost-like shape.

I taped plastic spoons to a spray can to make a smaller ghost. I then covered it with a plastic bag to protect the spray paint.

After you made your ghost shapes, cut a square of cheese cloth. There should be enough fabric to drape around the "feet" of the ghost.

Spray the cheese cloth with starch spray. I put 3 coats on my ghosts. You could also use some Elmer's glue to add more stability.


Tuesday, October 16, 2012
Gambit's Cue - Fall Fashion Special Edition
Chet Pourciau was featured in the November issue of Gambit's Cue, The Big Fall Fashion Issue. Read how you can fall into the coolest trends for your home by clicking on this LINK


Sunday, October 14, 2012
Emerald Green Painted Pillow

Emerald green is the color of Fall. The easiest way to keep on trend is to change out pillows and accessories. Follow the instructions below to make your own emerald green chevron pillow.
What you will need:
- Drop cloth (I bought mine for ~$10 at Lowes)
- Painters tape
- Fabric paint
- Stencil brush (or any paint brush)
- Sewing machine
- Ruler
- Scissors


Cut your drop cloth into a large enough piece to create two sides of a pillow. My piece was approximately 26" x 60". Use painters tape to create a chevron pattern on you drop cloth. I started off measuring and then decided it was taking was too long, so I went with a random chevron design.

This is what the drop cloth looked like after taping it all off.

Now you can start painting. Use a stencil brush to dab on the paint. Be careful not to paint under the tape.

This part takes a good hour to so, you have to be patient (which it hard for me haha)

Let the paint dry.

It was so satisfying to pull off the tape. Lucky, the paint didn't bleed under the tape.

I let the paint dry over night.

Time to make the pillow. The pillow I made was 22" x 22". Cut your "fabric" into two 24" x 24" squares. You can make sure they are square by folding the fabric diagonally.

With the painted sides of the pillow facing each other, sew around three sides of the pillow, about 3/4 of an inch from the edges. You can be more precise with all your measuring, but I tend to do things the easy way because I know I will be switching out these pillows soon enough.

After sewing around the three sides, flip the pillow inside out to show the painted side of the fabric. You can now stuff the pillow into the square you just sewed.

Now sew around the whole pillow to create an edge that is 1/4"

Done!


Subscribe to:
Posts (Atom)
